Intro
So this is going to be a kind of weird post where I geek out about keyboards. I know that for most people your computer keyboard is the most boring thing that you can think about, and if you quickly scroll this you might be thinking “who tf cares that much about keyboards ???”. And I get it, but if you consider that for a lot of people (writers, students, scientists, programmers) you interact with it for hours a day, it might start to make sense.
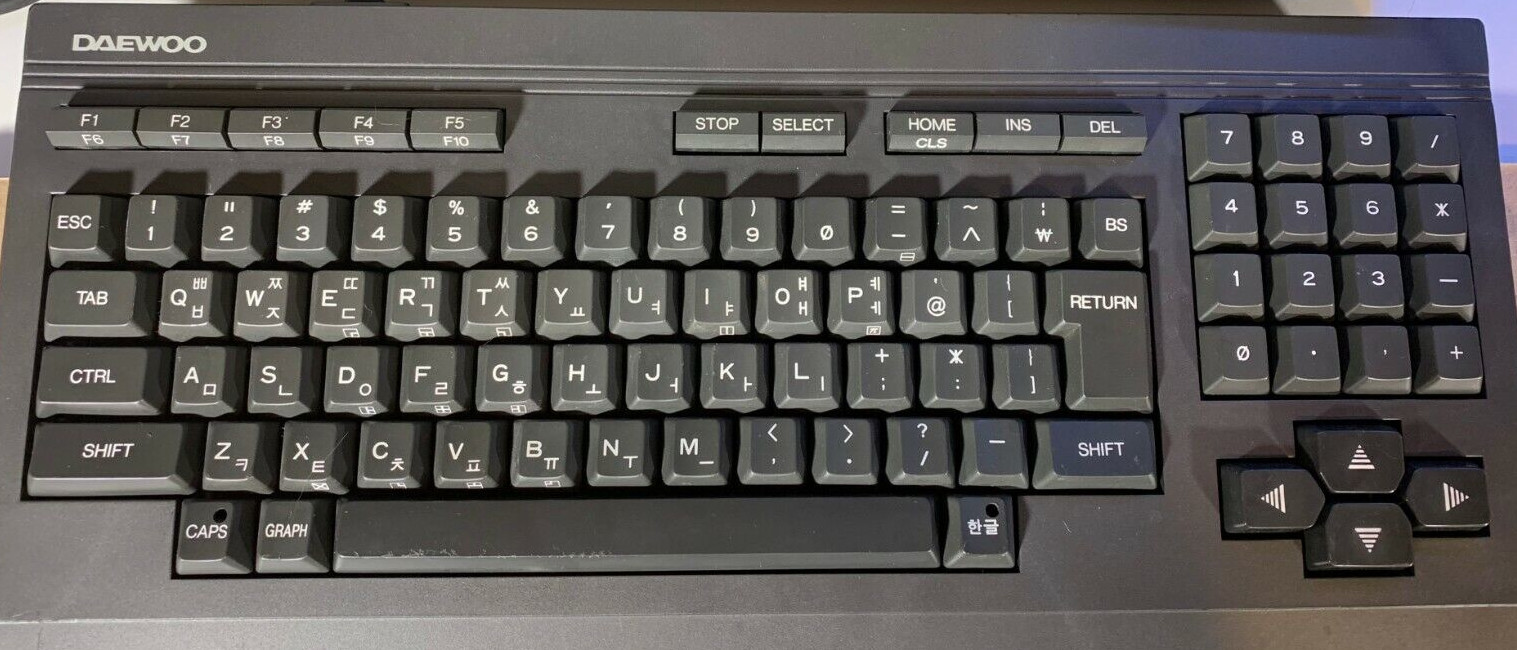
All of this for me started in 2016, I was getting into college and started to note some funky keyboards on youtube. I’ve had already heard about mechanical keyboards, but never gave it any attention at all, my trusted Microsoft membrane keyboard had all I ever could need, but one of those funky keyboard caught my attention, the WASD mechanical keyboard, and once I understood that you could personalize it the way that you wanted, I was hooked on the idea.
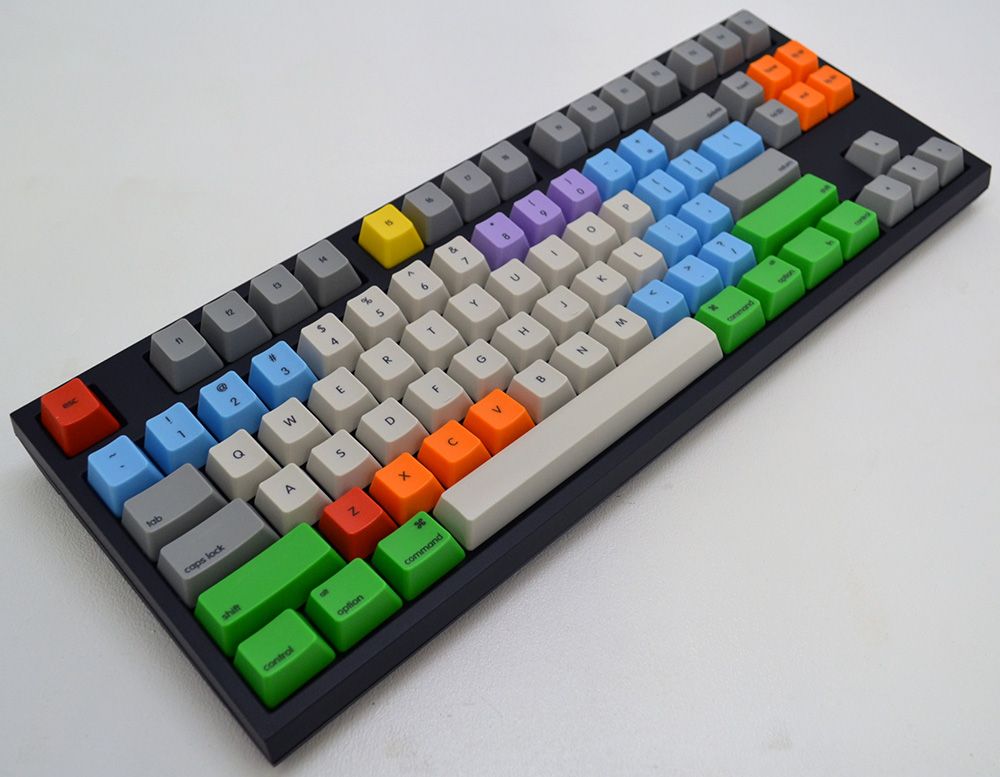 WASD custom keyboard
Since then I managed to create a little collection of mechanical keyboards, and started exploring all the options about this hobby. In this post I’ll try to explain some of the advantages, differences and customizations possibles when using a mechanical keyboard, and latter I’ll discuss how to use some of this features on a normal keyboard.
Keyboard form factors
The first difference that’ll notice about mechanical keyboards, is that they come in all shapes and forms. The next image you’ll see some common form factors available, including the full size (100%) that most normal keyboards have.
 Some of the available form factors
When talking about the form of the keyboard, what you should consider is pretty straight forward, it’s basically all about the size and reducing the number of keys to the minimum usable.
If you pay attention, the 80% keyboard (A.K.A. TKL) is the 100% keyboard, but without the numpad. Unless you do a lot of data input, using the numpad is pretty inefficient, and takes a lot of lateral space, usually where you have a mouse.
There are other form factors, in the picture, you can see the 40% keyboard, it is what is called a ortholinear keyboard, meaning all the keys are arranged in the form of a grid, and not staggered like they normally are.
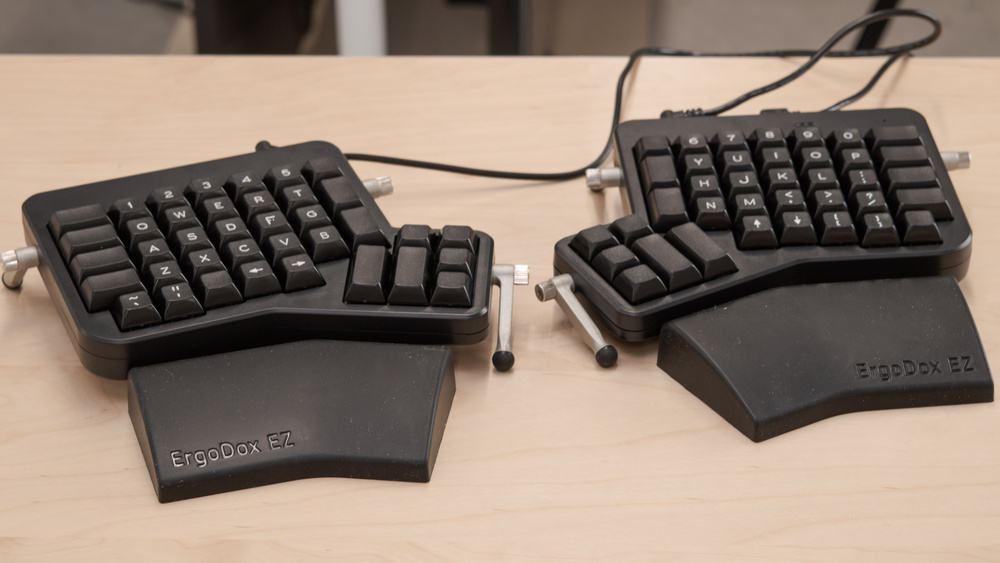 Ergodox EZ, split keyboard
Key switches
Another major customization point of mechanical keyboards is the vast options to key switches. When it comes to key switches, it all boils down to personal preference, different key switches fell different and sound different. Unless you’re need a specific type of switch, for something like gaming, or some industrial application, you can choose the switch that you like the most.
I’ll not go into detail about the different types of switches, because it’s usually the most covered topic, and there are a lot of great content about it, so you can easily find it on the internet.
New Keymap and Layers
Until now, all I’ve talked about is about how cool mechanical keyboards are, and how diverse the can be, but now we can talk about some useful stuff, things that honestly changed the way I interact with my computer, and arguably made me more productive.
Layers
Layers are not a new concept to anyone using a modern computer, the shift key is basically a key modifier that changes the main layer where you have the letter ‘a’, to a second layer where you have the letter ‘A’. People that use laptops also know about the FN key, that changes the layer of some of the keys to a second layer, something like F1 becomes volume down.
Now, imagine that you can take this concept and apply it to your entire keyboard, using your desired keys as modifiers, and assigning the function that you want to the other layer. Now, imagine that ANY key on you keyboard can be a modifier key, and you can have not one second layer, not two, but as many as you want. And to top it off, a key can be a modifier and normal key at the same time, we’ll talk about this later in detail, but firmware’s like QMK or softwares like Kmonad, allow you to configure a key to be a modifier when held, and a normal key when tapped.
Now, what can we do with this tool? Let’s stablish some goals:
- Be more productive - Can we use our computer faster and do more stuff ?
- Be more ergonomic - We spend most of the time typing, can we make it more comfortable and reduce the risk of injuries ?
- Be less distracting - How can we better focus on the idea that we want to input to the computer, and fiddle less with the keyboard ?
Death to the Caps Lock
Ok, we established some goals, now hear me out, the Caps Lock it’s the most useless key on the keyboard, and we have to get rid of it. When using the Caps Lock to capitalize your words, you’re losing a lot of time, the caps lock should be used only to YELL AT PEOPLE ON PUBLIC FORUMS, nothing more. The ‘right way’ is to use your shift key, press the left shift to upper case a key on the right side of the keyboard, ex.: LShift + o = O, and the opposite for the right shift (RShift + a = A).
This way, you’re only going to need the Caps lock to stuff like CONSTANTS on programming. You don’t use the caps lock anymore, no more accidentally hitting it, and now you have a extra key! Now you can rebind this key to a more useful function, because if you think about it, the caps lock it’s in a great place on the keyboard, on the home row, right next to your left pinky, so it’s really easy to reach.
Tap Caps to ESC
If you’re a programmer, or are involved in some areas in IT, you probably heard of VIM. In a nutshell, VIM is a really powerful text editor that focuses eliminating your need of using a mouse, and allow you to manipulate text files way faster than you can with a normal text editor.
The way the VIM accomplishes this, is by being a modal text editor, it basically has multiple modes, and the mode that you’re in define the behavior for the software. The main mode of vim is “NORMAL”, in this mode you can navigate the text file and manipulate it, with stuff like copying, cutting, deleting etc. It’s in NORMAL mode also that you enter other modes like INSERT and VISUAL for example, and the default keybind to returning to normal mode is the ESC key !
So when using VIM, using the default settings you’re a hitting the ESC key A LOT. And looking at your keyboard, the ESC key is pretty far from the home row, making you stretch your hand every time you want to press it. Even if you don’t use vim, the ESC key is used a lot to lose focus, de-select something and exit.
Esc on caps Vs. Default Esc
This way, making your Caps lock key send ESC, improves a lot the ergonomics of using the keyboard, even if you don’t use vim. Most OS’s allow you to swap Caps and ESC, this way you don’t lose the Caps behavior.
Hold Caps to Control
Now that you’re using the caps lock as an ESC, you might notice that you never hold your ESC key, this means that we can assign the hold behavior of the caps key to something else. If you think about, you never hit you control key a single time (except for gaming), so why not use Caps as Control ?
This is not a new concept, if you look at the keyboard layout of computers before the PC, you’ll notice that the control key is located in the now caps lock position, this was somewhat pretty common back then.
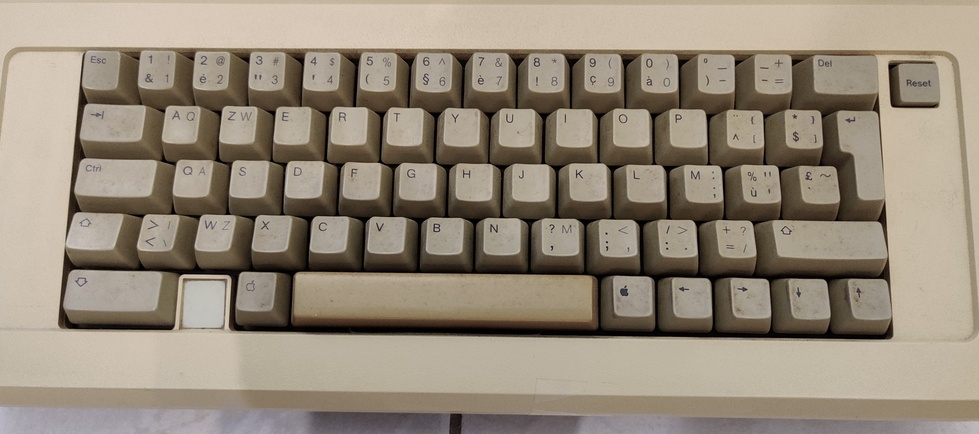 Apple II Keyboard
 MSX Keyboard
The reasoning here is pretty straight forward: ergonomics. While the ESC on Caps is pretty common with vim users, Control on Caps is really common on emacs, another popular editor, where most keybindings use the Control key, usually in some really weird and uncomfortable way. Even though I don’t use emacs, we use Ctrl shortcuts all the time, to copy, paste, cut, new tab, print etc. And the terminal multiplexer tmux also use a lot of keybindings with the control key.
Setting your Caps to Control it just really comfortable, I initially thought that I would NEVER adapt, I’ve been using the default layout since the first day that I touched a computer, but all it took was a single week, and I’m not looking back.
Reaching other layers
Previously I’ve talked briefly about layers, and went on a long rant about the caps lock. Now my goal is to cram as much functionality as possible, on your most used keys. What we accomplish with this, is reducing the travel distance of your fingers, and we can put useful keys that usually are far away and on non standard positions, such as screenshot and media keys, closer to your home row.
With the caps lock reassignment, we’ve learned that we can use a single key, to two different functions, distinguishing between a key tap and a key hold. To accomplish our goal of keeping our most used keys closer to the home row, we’ll again use this technique.
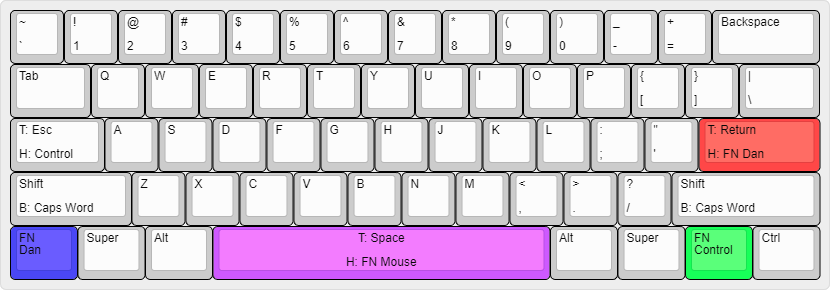
In the above image, you can see the modifiers keys colored. The Return key is a modifier when held, leading to the second layer. This key was chosen because it’s on a really comfortable position on the main row, that you can reach with your pinky finger, just like the caps lock key.
The Left Control key, now free, is also used as a modifier to the same second layer assigned to the Return key. We discussed that the control key is not on a great position to be a modifier, so that we put it on the caps lock, but the thing is, we can press it using the palm of our hand, and for keys on the opposite side of the keyboard, this is okay.
With two keys, opposite to each other on the keyboard, we can now access the second layer easily, and I chose to separate the left and right side to different functions.
Media keys and macros
To the left side, accessing mainly with the return key, we have your media keys, some shortcuts, and macros. These keys I use all the time, and were previously scattered around the keyboard, now they are grouped together, and consistent across all my computers.
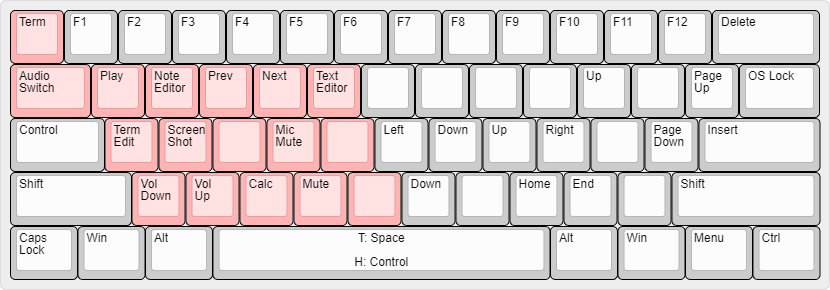 Media keys in red
About these keys, one interesting thing is the ‘Term Edit’ macro key, it basically is a macro for Ctrl-x Ctrl-e, this combination open the current command line on your default editor, really useful for long commands.
Another thing is that being in the Left side of the keyboard, you can still use them while using the mouse, just use the old control key as the modifier.
Navigation and Text editing
On the left side of the keyboard, we have the navigation and text editing keys, on my 60% keyboard these keys don’t even exist physically, but they are obviously needed.
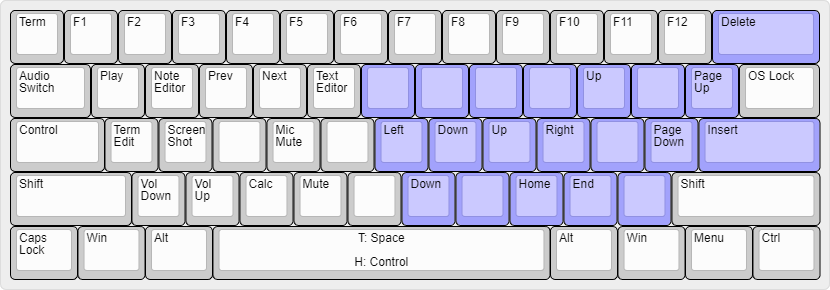 Navigation and editing keys in blue
I think I’ve accomplished some nice things here. First, the arrow keys are not only the in the home row, they are also VIM style, so I can basically have universal vim-like control, independent of the software that I’m using. Another nice thing is the redundant Up and Down with P and N, these are EMACS style keybindings, and are really useful to navigate through menus, if you’re already accustomed to it.
As I’ve said before, the bulk of my text editing is done with VIM motions on whatever text editor I’m using, but not all software is VIM friendly, and sometimes you need to edit text on a web browser, or a text box on a GUI software, and for these, this mapping is okay.
QMK
At this point I might have convinced you that you should get a mechanical keyboard, and mess around with layers and keymaps, or, you might be thinking that I’m REALLY overthinking this and should go outside more often.
Well, if you’re in the second group, you’re probably right, but I can´t write a blog post about it, so we can proceed to the next step, which is actually implementing all of this.
What is QMK
QMK is a open source firmware for keyboards, it allows you to use all the features that I’ve talked about, and a lot more. With QMK, your keyboard is now programmable, in every meaning of the word. You can apply all the concepts that I’ve talked about using a simple web interface, like QMK Configurator or VIA, or you can write some C code to do basically anything, want to actuate a servo motor when you press a key ? You can do it, although you probably shouldn’t.
Native Keyboards
Some keyboards on the market already come with QMK, you’ll have to check the specs of the keyboard, and do a little research to confirm that it’s compatible with QMK, but today is really easy to find these on Aliexpress.
I would like to mention and recommend the Keychron keyboards. Keychron has been a game changer company in the market, they have really well constructed keyboards, with a lot of form factors and switch options, and more importantly, they have a really good price (when compared to other mechanical keyboards), and good availability. If you’re looking to a first mechanical keyboard, the K Pro series, or the V series are really good options, and they come with QMK support.
When using a native QMK keyboard, the process boils down to flashing the firmware generated by qmk configurator, or simply using VIA to configure your keyboard.
USB-USB Converter
Another great option is to use a adapter called USB-USB converter, this way you can use any keyboard that you want, and still have all the QMK features. This is very handy if you already have a keyboard that you like, and don’t want to buy a new one, or you have to use a keyboard from work or school, and want to customize it.
The way the adapter works is basically a translator between your common keyboard, and a QMK keyboard. You make your keymap just like any other QMK keyboard and flash it to the converter, when you plug your keyboard on the USB, it’ll behave like you programmed it.
Yao Wei’s Blog was a really good resource for me when I was building my converter, you should check it out if you want to build one yourself.
Yao’s converter is made using an Arduino Pro Micro, I chose to use a Arduino Leonardo instead, because it needs basically no soldering or assembly, all you need is to attach the USB Host Shield on top of the Arduino and flash QMK. All I did extra was to 3D print a case for it, to protect it from any damage.
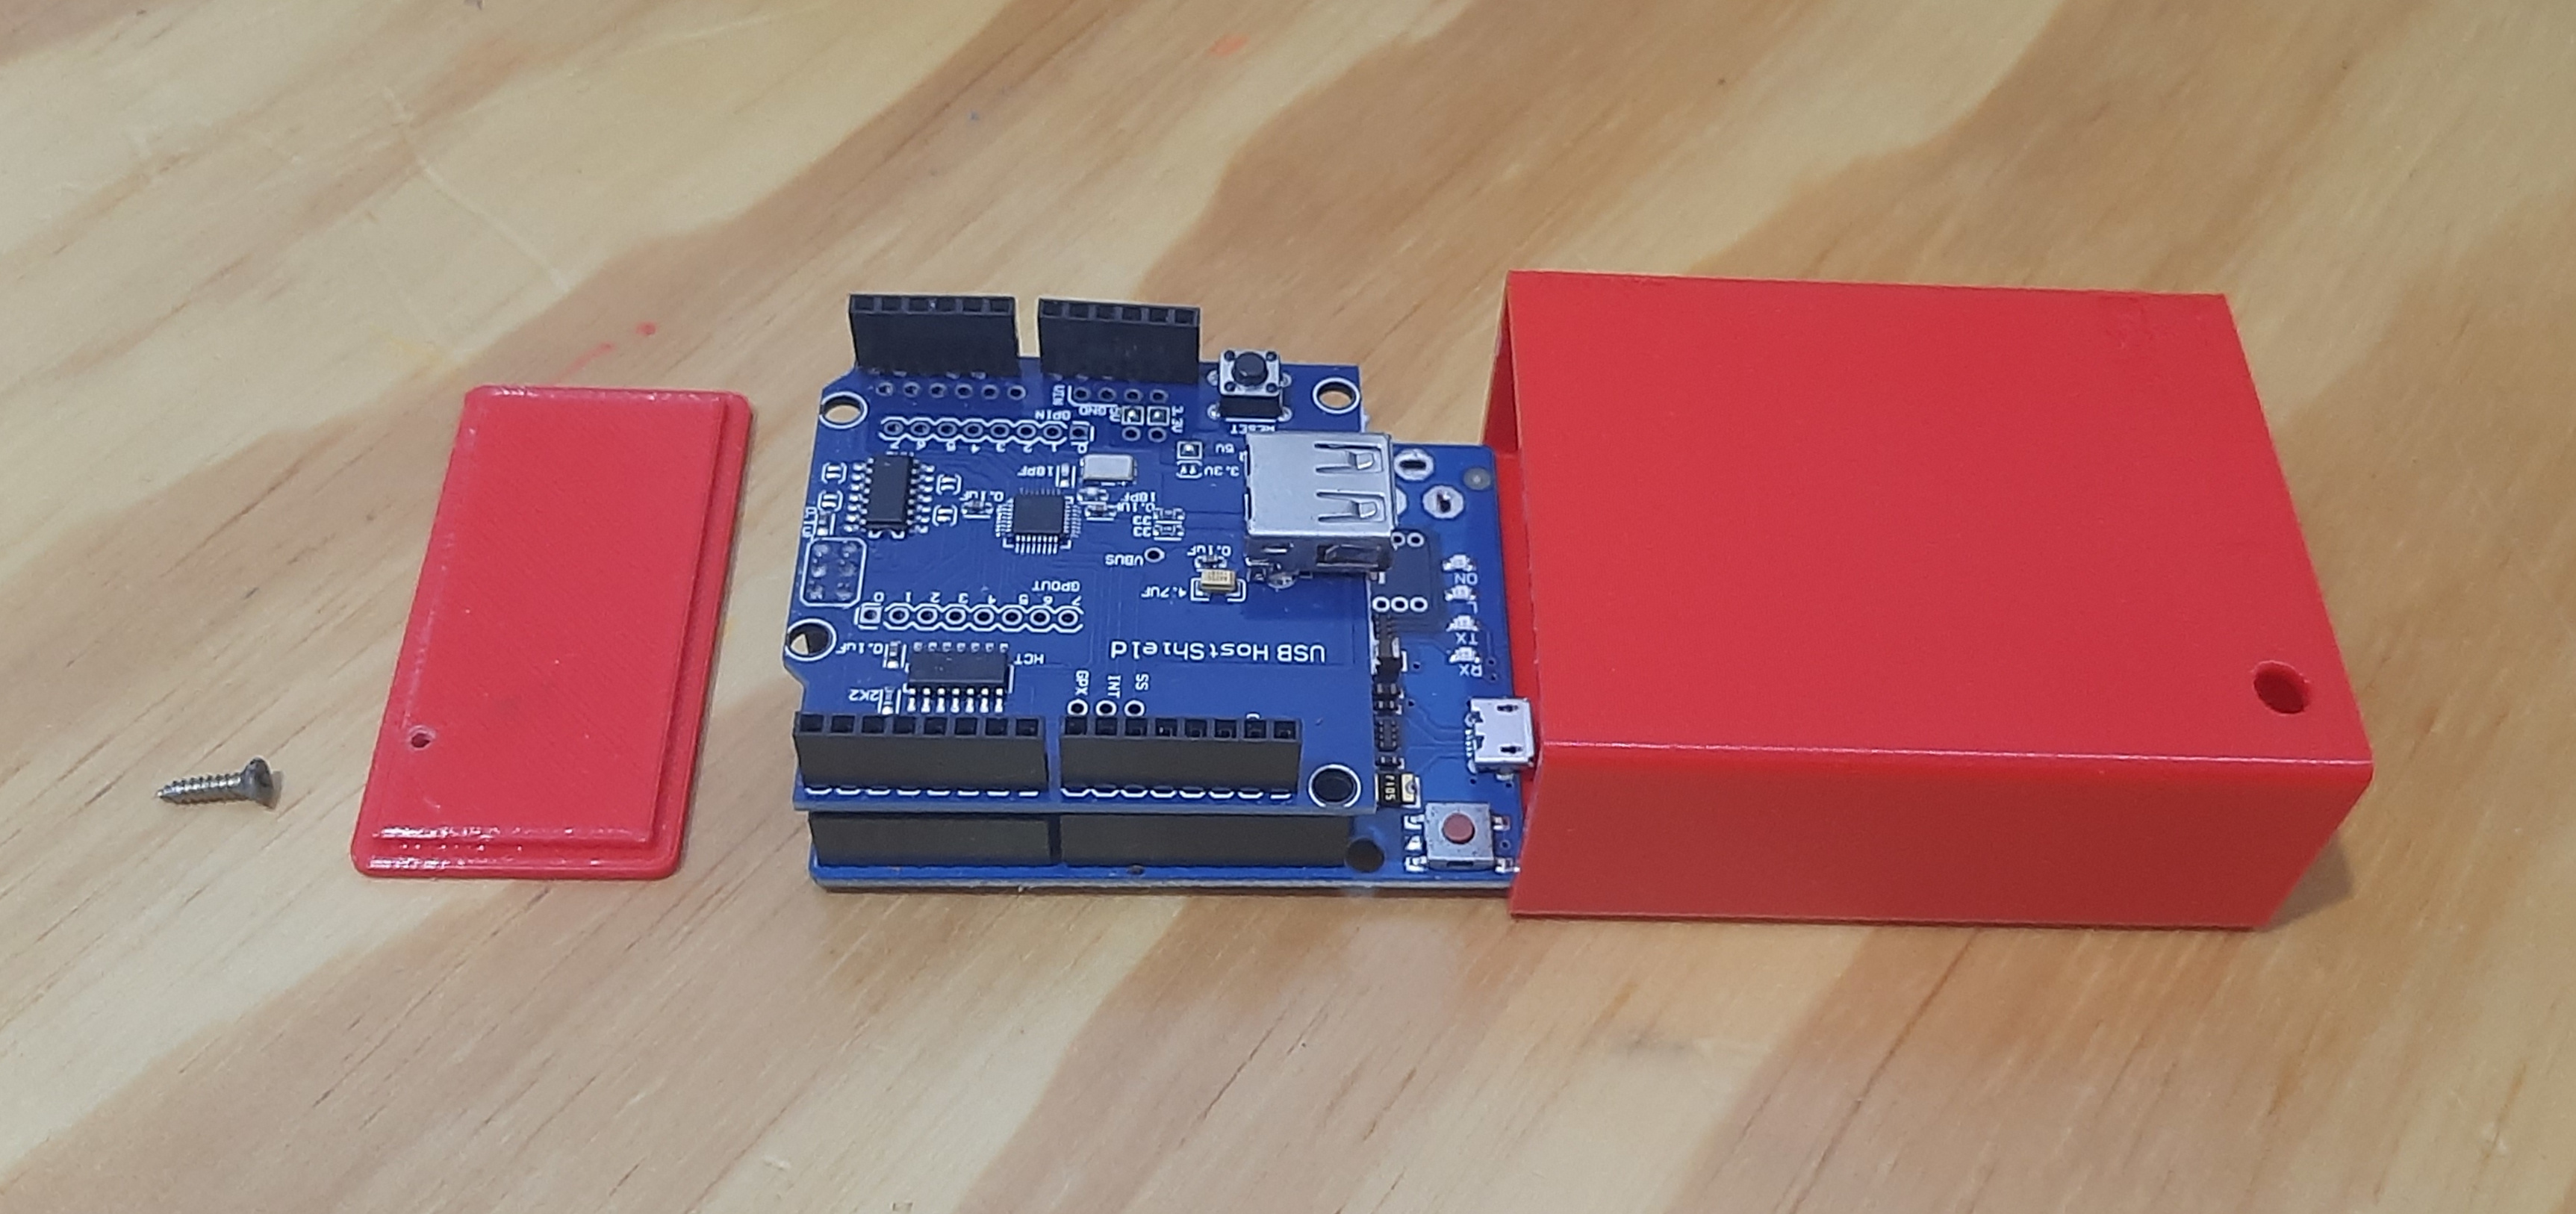 USB-USB Converter, Arduino Leonardo + USB Host Shield + 3D Print case
Kmonad
When you don’t want to invest in hardware, or you need to map some keys on your laptop for example, you can use a software solution.
Kmonad is a software that allows you to create a custom keymap for your keyboard, and use it on any OS. Written in haskell, it has worked flawlessly for me on Linux for more than two years, and almost as well compared to QMK, missing only some features like mouse support and Caps Word.
The problem with kmonad is basically installation and setup, you’ll probably need to compile it yourself, and write your own keymap, but once you get it working, it stays working.
You can checkout my github repository for a keymap example and service file for systemd.
Conclusion
This post was a little difficult to write, I wanted to talk about keyboards and all the cool stuff that you can do with them, but I had to kinda restrain myself and focus on some points that I find really interesting. There are a lot of other topics to cover, ISO vs Ansi, Layouts(QWERTY, Dvorak, Colemak), keycaps, switches, build materials, programming and a lot more, this is a surprisingly rich hobby. But I think that I’ve covered the most important points to me, and I hope that it was a bit interesting to you.